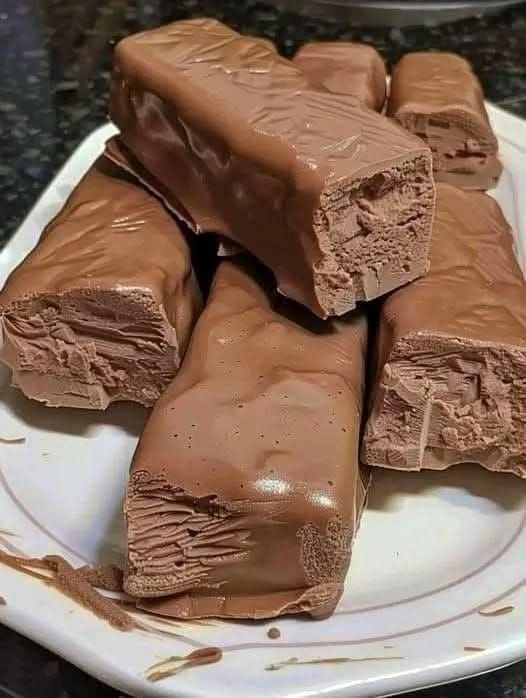
A Homemade Keto Candy with a Light, Chewy Center
Making candy at home may seem difficult at first, but this keto chocolate nougat proves that even classic chocolate bars can be recreated with simple techniques and sugar-free ingredients. The result is a soft, fluffy nougat center wrapped in a rich chocolate coating, giving you a satisfying homemade treat without added sugar.
Unlike many low-carb candy recipes that rely on cream cheese or whipped toppings for texture, this version focuses on creating a genuine nougat. The texture is light, slightly chewy, and smooth, closely resembling a traditional chocolate nougat bar while staying keto-friendly. Once the nougat has fully set, it slices neatly into bars and holds its shape beautifully under a layer of melted chocolate.
This recipe requires patience more than complicated skills. Paying attention to temperature, mixing time, and cooling allows the ingredients to develop the signature texture that makes nougat so enjoyable. Every step contributes to creating a candy that is soft enough to bite into while remaining firm enough to handle and coat in chocolate.
What Makes This Recipe Different?
The secret to achieving an authentic nougat texture is combining whipped egg whites with a carefully cooked sugar-free syrup. As the hot syrup is slowly added, it gently cooks and stabilizes the egg whites, creating a fluffy mixture that gradually thickens as it cools.
Instead of depending entirely on cocoa powder for chocolate flavor, this recipe uses sugar-free chocolate pudding mix. Besides adding chocolate flavor, it also helps the nougat maintain its soft structure and prevents excess moisture from affecting the final consistency.
- The finished candy has three noticeable qualities:
- A light and airy center
- A smooth chocolate flavor throughout the nougat
- A firm chocolate shell that complements the soft filling
- After refrigerating overnight, the texture continues to improve, making each bar easy to cut and coat.
Why Sugar-Free Chocolate Pudding Mix Works So Well
- Chocolate pudding mix may seem like an unusual ingredient for homemade candy, but it serves several useful purposes.
- First, it distributes chocolate flavor evenly throughout the nougat without making the mixture overly dense. Traditional cocoa powder absorbs moisture differently and can create a heavier texture if too much is added.
- Second, the pudding mix contains ingredients that naturally help stabilize the nougat. These ingredients bind moisture and support the fluffy structure that develops during mixing.
- Some of the biggest advantages include:
Better Moisture Balance
- The pudding mix helps absorb extra moisture, reducing the chance of sticky nougat after cooling.
Improved Structure
- The stabilizing ingredients help the candy remain firm enough for slicing while still keeping the center tender.
Longer Freshness
- Because moisture is better controlled, the bars stay enjoyable for several days when refrigerated.
Understanding the Importance of Temperature
- Candy making is largely controlled by temperature. Even small differences can completely change the final texture.
- For this recipe, the syrup should reach 300°F, commonly called the hard crack stage. At this point, the sweetener mixture develops the proper consistency needed for chewy nougat.
- If the syrup is removed from the heat too early, the candy may stay sticky and never fully set. On the other hand, heating beyond the recommended temperature can create a brittle center instead of a soft bite.
- Using a candy thermometer removes the guesswork and provides consistent results.
Whipping the Egg Whites Correctly
- While the syrup cooks, the egg whites should be beaten until firm peaks develop.
- Firm peaks create the foundation for the entire recipe. As the hot syrup is gradually added, the egg whites become stronger and trap tiny air bubbles throughout the mixture.
- These air pockets are responsible for the light texture that makes homemade nougat enjoyable.
- Adding the syrup too quickly can flatten the egg whites before they have time to stabilize. Instead, pour the syrup slowly in a thin stream over two to three minutes while continuing to beat the mixture.
- Taking your time during this stage produces a smoother and more uniform nougat.
Why Continued Mixing Matters
- Many people assume the nougat is ready as soon as all of the syrup has been added, but this recipe benefits from extended mixing.
- Continue beating the mixture for approximately 15 to 20 minutes.
- During this time several important changes happen naturally:
- The mixture increases in volume.
- The color gradually becomes lighter.
- The texture thickens.
- Excess heat slowly escapes.
- Air becomes evenly distributed throughout the nougat.
- These changes work together to produce a candy that feels soft rather than dense.
Skipping this stage or shortening the mixing time often results in a heavier texture that doesn’t resemble classic nougat.
Folding in the Chocolate Pudding Mix
- Once the nougat has cooled slightly during mixing, reduce the mixer to its lowest speed before adding the chocolate pudding mix.
- Mix only until incorporated, then finish folding gently by hand.
- Gentle folding prevents unnecessary deflation while ensuring every bite has consistent chocolate flavor.
- The finished mixture should appear thick, fluffy, and smooth, making it easy to spread into the prepared loaf pan.
Preparing the Pan
- Before beginning the recipe, line a 9×5 loaf pan with parchment paper.
- Since nougat naturally becomes sticky during preparation, lightly coating your hands and tools with oil makes handling much easier.
- After transferring the nougat into the pan, place another sheet of parchment paper over the surface and gently press until the top becomes smooth and even.
- This simple step creates flat bars that are easier to coat with chocolate later.
Allowing the Nougat to Set Properly
- Once the nougat has been spread evenly in the prepared pan, the most important step is allowing it to rest. Although it may look ready after mixing, the structure inside the candy is still developing. Refrigerating the pan overnight gives the ingredients enough time to firm up, making the nougat easier to cut and coat with chocolate.
- Avoid trying to speed up this process. A longer resting time helps the center become stable while maintaining its soft and chewy texture. By the next day, the nougat should feel firm to the touch but still have a slight softness when pressed gently.
- When the nougat has fully chilled, carefully loosen the edges with a knife that has been lightly coated with oil. This prevents sticking and helps lift the candy out of the pan without damaging its shape. Turning the slab onto a cutting board makes slicing much easier.
Cutting Neat Chocolate Bars
- Nougat is naturally sticky, so preparing your knife before every few cuts makes a noticeable difference. Lightly spraying or greasing the knife with oil allows it to glide through the candy instead of pulling the nougat apart.
- For large candy bars, cut the slab into six equal portions. If you prefer smaller servings, simply divide each piece once more to create bite-sized bars.
- Try to keep each piece close to the same size. Uniform bars not only look more appealing but also coat evenly with chocolate.
Preparing the Chocolate Coating
- The chocolate coating gives the bars their classic finish while adding a rich chocolate flavor that balances the light nougat center.
- Combine the unsweetened chocolate baking bits, confectioners erythritol, liquid monk fruit, and liquid coconut oil in a saucepan over low heat. Stir continuously until everything has melted into a smooth mixture.
- Low heat is important because chocolate can scorch quickly if it becomes too hot. Gentle stirring helps create a glossy coating without burning the chocolate.
- The coconut oil also plays an important role. Instead of creating a hard shell that cracks easily, it keeps the coating slightly flexible, making each bite smoother and more enjoyable.
Coating the Nougat Bars
- After the chocolate has completely melted, place the prepared nougat bars on a wire rack or parchment-lined tray.
- Pour or spoon the melted chocolate over the bars, allowing the excess to drip away. Once the coating has hardened, carefully flip each bar and coat the remaining side.
- If you prefer a quicker method, you can coat only the top and sides while leaving the bottom plain. Either option produces delicious results.
- Allow the chocolate to set completely before storing or serving the candy.
Helpful Tips for the Best Results
- Although the recipe uses simple ingredients, a few small details make the process much easier.
Measure Everything Before Starting
- Candy making moves quickly once the syrup begins cooking. Having every ingredient measured and ready prevents unnecessary delays.
Use Room Temperature Egg Whites
- Egg whites whip faster and create greater volume when they are not cold. More volume means a lighter and fluffier nougat.
Watch the Syrup Carefully
- As the syrup approaches 300°F, the temperature rises quickly. Keeping a close eye on the thermometer prevents overcooking.
Pour the Syrup Slowly
- Adding the hot syrup in one large pour can collapse the whipped egg whites. A slow, steady stream produces a stable and airy mixture.
Don’t Rush the Mixing Time
- The full 15 to 20 minutes of mixing allows the nougat to cool gradually while trapping air throughout the mixture. This step has a major impact on the finished texture.
Common Mistakes to Avoid
- Even small changes can affect homemade candy. Avoiding these common mistakes will improve your chances of success.
Stopping the syrup below 300°F
- If the syrup does not reach the correct temperature, the nougat may remain soft and sticky instead of becoming firm.
Adding the syrup too quickly
- Pouring too fast can deflate the whipped egg whites, producing a dense candy instead of a light one.
Skipping the overnight chill
- The nougat needs time to stabilize. Cutting it too early usually results in uneven slices.
Overheating the chocolate
- Chocolate should melt slowly over low heat. High temperatures can make it thick, grainy, or scorched.
Using dry tools
- A lightly oiled knife and hands prevent sticking and make shaping much easier.
Storage Tips
- These keto chocolate nougat bars are best stored in the refrigerator.
- Arrange the bars in an airtight container, separating layers with parchment paper if needed. Properly stored, they stay fresh for up to seven days.
- Before serving, allow the bars to sit at room temperature for a few minutes. This short resting time softens the nougat slightly and creates the ideal texture.
- If you need to transport the bars, keep them cool until serving so the chocolate coating remains firm.
Serving Ideas
- These homemade nougat bars are perfect for satisfying chocolate cravings while following a low-carb lifestyle. They can be enjoyed as an afternoon snack, after-dinner dessert, or homemade edible gift.
- For a decorative presentation, wrap each bar individually in parchment paper or food-safe candy wrappers. They also make an attractive addition to dessert trays during holidays or family gatherings.
- Because the bars are rich and satisfying, a single serving is often enough to enjoy the smooth chocolate coating and fluffy nougat center.
Description
- Enjoy a homemade keto chocolate nougat candy with a light, fluffy center and a smooth chocolate coating. This low-carb dessert is made with sugar-free sweeteners and chocolate pudding mix to create a soft nougat that slices beautifully and delivers a classic candy bar texture without added sugar.
Recipe Details
- Prep Time: 10 minutes
Cook Time: 45 minutes
Cooling Time: 8 hours
Total Time: 8 hours 55 minutes - Course: Dessert
Cuisine: American
Servings: 6 bars
Calories: 22 kcal per bar
Equipment
- 9×5 bread pan
- Parchment paper
- Candy thermometer
- Electric mixer
- Large mixing bowl
- Medium saucepan
- Large nonstick pot
- Spatula
- Sharp knife
Ingredients
Chocolate Nougat
- 1 cup monkfruit sweetener
- 3/4 cup sugar-free honey substitute
- 1 tablespoon water
- 1 teaspoon vanilla extract
- 2 large egg whites, room temperature
- 1/3 cup Simply Delish Chocolate Pudding Mix
- 1/4 teaspoon cream of tartar
Chocolate Coating
- 1 cup unsweetened chocolate baking bits (or 8 ounces unsweetened chocolate)
- 3 tablespoons confectioners erythritol
- 10 drops liquid monkfruit
- 1 tablespoon liquid coconut oil
Instructions
Prepare the Pan
- Line a 9×5 bread pan with parchment paper, making sure the paper extends over the sides for easy removal. Set the pan aside.
Cook the Syrup
In a large nonstick pot, combine the monkfruit sweetener, sugar-free honey substitute, water, and vanilla extract. Cook over medium heat, stirring continuously until the sweetener dissolves completely. Continue cooking until the syrup reaches 300°F on a candy thermometer.
Whip the Egg Whites
While the syrup is heating, place the egg whites and cream of tartar into a large mixing bowl. Beat with an electric mixer until firm peaks form.
Add the Hot Syrup
With the mixer running on medium-high speed, slowly pour the hot syrup into the whipped egg whites in a thin, steady stream. Take about 2–3 minutes to add the syrup gradually.
Continue beating the mixture for 15–20 minutes. The nougat will increase in volume, become lighter in color, and develop a thick, fluffy consistency.
Add the Pudding Mix
Reduce the mixer to the lowest speed and slowly add the Simply Delish Chocolate Pudding Mix. Once incorporated, stop the mixer and gently fold the mixture with a spatula until fully blended. \
Shape the Nougat
Transfer the nougat mixture into the prepared loaf pan. Lightly grease your hands with oil and gently press the mixture into an even layer. Cover with another sheet of parchment paper and smooth the surface.
Chill Overnight
Refrigerate the nougat overnight or until completely firm.
Slice the Bars
Loosen the edges with a lightly greased knife and remove the nougat from the pan. Place it on a cutting board and cut into 6 equal bars, greasing the knife as needed to prevent sticking.
Make the Chocolate Coating
In a medium saucepan, combine the unsweetened chocolate baking bits, confectioners erythritol, liquid monkfruit, and liquid coconut oil. Melt over low heat, stirring constantly until smooth.
Coat the Bars
Pour or spoon the melted chocolate over the nougat bars. Allow the coating to set before turning each bar over to coat the opposite side. Alternatively, coat only the top and sides if preferred.
Store and Serve
Refrigerate the finished bars until the chocolate is fully set. Let the bars stand at room temperature for a few minutes before serving for the best texture.
Notes
- A candy thermometer is highly recommended for accurate results.
- Heat the syrup to 300°F to achieve the proper chewy nougat texture.
- Slowly adding the syrup helps maintain the volume of the whipped egg whites.
- Mixing for the full 15–20 minutes creates a lighter and fluffier nougat.
- Lightly oil your hands, knife, and spatula to prevent sticking.
- Refrigerating the nougat overnight makes slicing much easier.
- Store the bars in an airtight container in the refrigerator for up to 7 days.
Nutrition
- Calories: 22 kcal
- Carbohydrates: 6 g
- Protein: 0.04 g
- Fat: 2 g
- Saturated Fat: 2 g
- Polyunsaturated Fat: 0.04 g
- Monounsaturated Fat: 0.1 g
- Sodium: 1 mg
- Potassium: 22 mg
- Sugar: 0.1 g
- Calcium: 0.1 mg
- Iron: 0.01 mg
