High-Protein Banana Pudding (Extra-Large Detailed Recipe)
This high-protein banana pudding is designed to be rich, creamy, filling, and packed with protein while still delivering the classic banana pudding flavor. The recipe makes a large batch suitable for meal prep, family gatherings, fitness enthusiasts, or anyone who wants a protein-rich dessert that can also work as a snack or breakfast.
Yield
12–14 servings
Approximate Nutrition Per Serving (12 servings)
- Calories: 250–290
- Protein: 20–25 grams
- Carbohydrates: 20–25 grams
- Fat: 5–8 grams
Values vary depending on the specific ingredients used.
Ingredients
For the Protein Pudding Base
- 4 cups (960 g) plain nonfat Greek yogurt
- 2 cups (480 ml) fairlife milk or any high-protein milk
- 2 scoops (about 60 g) vanilla whey protein powder
- 1 scoop (about 30 g) vanilla casein protein powder
- 2 boxes (3.4 oz each) instant vanilla pudding mix
- 3 tablespoons honey or maple syrup
- 2 teaspoons pure vanilla extract
- 1 teaspoon banana extract (optional but highly recommended)
- 1/4 teaspoon salt
For the Banana Layer
- 6 large ripe bananas
- 1 tablespoon lemon juice
For the Cookie Layer
- 60 vanilla wafer cookies or high-protein vanilla cookies
For the Protein Whipped Layer
- 1 cup light whipped topping
- 1 cup Greek yogurt
- 1 scoop vanilla protein powder
- 1 teaspoon vanilla extract
Optional Toppings
- Additional banana slices
- Crushed vanilla wafers
- Chopped roasted almonds
- Chopped walnuts
- Unsweetened coconut flakes
- Cinnamon
- Sugar-free caramel drizzle
Equipment Needed
- Large mixing bowl
- Electric hand mixer or stand mixer
- Rubber spatula
- Measuring cups and spoons
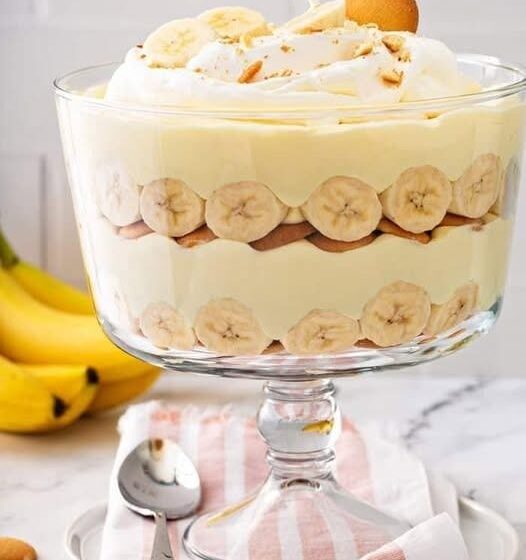
- Large trifle dish or 9 x 13 inch baking dish
- Sharp knife
- Cutting board
Step 1: Prepare the Bananas
Choose bananas that are ripe with a few brown spots. They should be sweet and flavorful but not overly mushy.
Peel all six bananas and slice them into rounds approximately 1/4 inch thick.
Place the banana slices into a bowl and gently toss with the lemon juice. This helps slow browning and keeps the banana slices looking fresh for a longer period.
Set aside while preparing the pudding mixture.
Step 2: Create the High-Protein Pudding Base
In a very large mixing bowl, add the Greek yogurt.
Pour in the high-protein milk.
Add the vanilla whey protein powder and casein protein powder.
The combination of whey and casein creates a thicker, more authentic pudding texture. Whey alone can sometimes make pudding slightly thin, while casein contributes creaminess and body.
Add both boxes of instant vanilla pudding mix.
Pour in the vanilla extract.
Add banana extract if using.
Add the honey or maple syrup.
Sprinkle in the salt.
Using an electric mixer on low speed, begin mixing the ingredients.
Gradually increase to medium speed and continue mixing for about 2 to 3 minutes.
The mixture should become thick, smooth, creamy, and free of lumps.
Scrape down the sides of the bowl several times during mixing to ensure everything incorporates evenly.
After mixing, allow the pudding base to rest for about 5 minutes. During this time, the pudding mix and protein powders will continue absorbing liquid and thickening.
Stir once more after resting.
The final consistency should resemble traditional banana pudding: thick, creamy, and spoonable.
Step 3: Prepare the Protein Whipped Layer
In a separate bowl, combine:
- 1 cup light whipped topping
- 1 cup Greek yogurt
- 1 scoop vanilla protein powder
- 1 teaspoon vanilla extract
Whisk until completely smooth.
The mixture should become light and fluffy while still maintaining enough structure for layering.
Refrigerate until needed.
Step 4: Assemble the First Layer
Place a single layer of vanilla wafers across the bottom of the dish.
Cover the entire bottom surface.
Some overlapping is perfectly acceptable.
Next, arrange approximately one-third of the banana slices over the cookies.
Spread one-third of the pudding mixture over the bananas.
Use a spatula to spread the pudding evenly into all corners.
This first layer forms the foundation of the dessert and begins the process of softening the wafers.
Step 5: Assemble the Second Layer
Add another layer of vanilla wafers.
Cover with another third of the banana slices.
Spread another third of the pudding mixture evenly over the bananas.
Take time to smooth the surface.
Even layers produce a more attractive final presentation and ensure every serving contains balanced amounts of banana, pudding, and cookies.
Step 6: Assemble the Third Layer
Repeat the layering process one final time.
Add the remaining vanilla wafers.
Top with the remaining banana slices.
Spread the final portion of pudding mixture evenly across the entire dish.
Use a spatula to create a smooth finish.
Step 7: Add the Protein Whipped Topping
Remove the protein whipped layer from the refrigerator.
Spread it gently over the top pudding layer.
Work slowly to avoid mixing it into the pudding beneath.
Create decorative swirls with the back of a spoon if desired.
The whipped layer adds extra protein while giving the dessert a bakery-style appearance.
Step 8: Chill Properly
Cover the dish tightly with plastic wrap or a lid.
Place in the refrigerator for at least 6 hours.
For the best flavor and texture, refrigerate overnight.
During this resting period:
- The pudding thickens further.
- The banana flavor spreads throughout the dessert.
- The cookies soften into a cake-like consistency.
- The layers meld together into a classic banana pudding texture.
Patience is important here because the pudding becomes significantly better after a long chill.
Step 9: Add Final Toppings
Just before serving, add any desired toppings.
You may scatter crushed vanilla wafers over the top for crunch.
A light dusting of cinnamon can enhance the banana flavor.
Chopped nuts provide texture and additional nutrients.
Fresh banana slices can be arranged decoratively around the surface.
A small drizzle of sugar-free caramel can add extra dessert-like appeal.
Step 10: Serve
Use a large serving spoon to scoop portions into bowls or dessert cups.
Each serving should include layers of pudding, bananas, softened wafers, and protein topping.
The texture should be creamy, rich, and satisfying while delivering substantially more protein than traditional banana pudding.
Storage
Store covered in the refrigerator for up to 4 days.
For best texture, consume within 2 to 3 days.
The pudding is not ideal for freezing because the bananas and yogurt can become watery after thawing.
Tips for Maximum Protein
To increase the protein even further:
- Use only high-protein milk.
- Add an additional scoop of casein protein.
- Use Greek yogurt with at least 10 grams of protein per serving.
- Replace traditional wafers with protein cookies.
- Add powdered peanut butter to the pudding mixture.
- Stir in cottage cheese that has been blended until completely smooth.
- Top with roasted nuts for extra protein and healthy fats.
With these modifications, a serving can easily reach 30 grams or more of protein while maintaining the classic creamy banana pudding taste.