Gluten-Free Focaccia Bread (Very Detailed Recipe)
Ingredients
For the Dough
- 500 g gluten-free bread flour blend (with xanthan gum included)
- 10 g instant yeast
- 10 g sugar or honey
- 10 g fine sea salt
- 480 ml warm water (about 38–43°C / 100–110°F)
- 60 ml olive oil
For the Pan and Topping
- 3–4 tablespoons olive oil
- 1 teaspoon flaky sea salt
- 1 teaspoon dried rosemary (optional)
- 1 teaspoon dried oregano (optional)
Equipment
- Large mixing bowl
- Wooden spoon or dough whisk
- 9 × 13 inch (23 × 33 cm) baking pan
- Plastic wrap or clean kitchen towel
Step 1: Activate the Yeast
In a large bowl, combine the warm water, sugar, and yeast. Stir gently and allow the mixture to sit for 5–10 minutes. The surface should become slightly foamy, indicating that the yeast is active.
Step 2: Mix the Dough
Add the gluten-free flour blend and salt to the yeast mixture. Pour in the olive oil.
Mix thoroughly with a wooden spoon or dough whisk. The dough will not resemble traditional wheat dough. Instead, it will be thick, sticky, and more like a very heavy batter. Continue mixing for 3–5 minutes to ensure the ingredients are fully incorporated.
Because gluten-free dough lacks the elastic gluten network found in wheat dough, vigorous kneading is unnecessary.
Step 3: First Rise
Cover the bowl with plastic wrap or a clean towel.
Place the bowl in a warm, draft-free location and allow the dough to rise for approximately 45–60 minutes. The dough should increase noticeably in volume and appear airy.
Step 4: Prepare the Baking Pan
Generously coat the baking pan with 2 tablespoons of olive oil.
Transfer the risen dough into the pan. Drizzle another tablespoon of olive oil over the top.
Using oiled hands or an oiled spatula, gently spread the dough toward the corners of the pan. If the dough resists spreading, allow it to rest for 5–10 minutes and then continue.
Aim for an even thickness across the entire pan.
Step 5: Second Rise
Cover the pan loosely and let the dough rise again for 20–30 minutes.
During this time, preheat the oven to 220°C (425°F).
The dough should become slightly puffier but may not double in size.
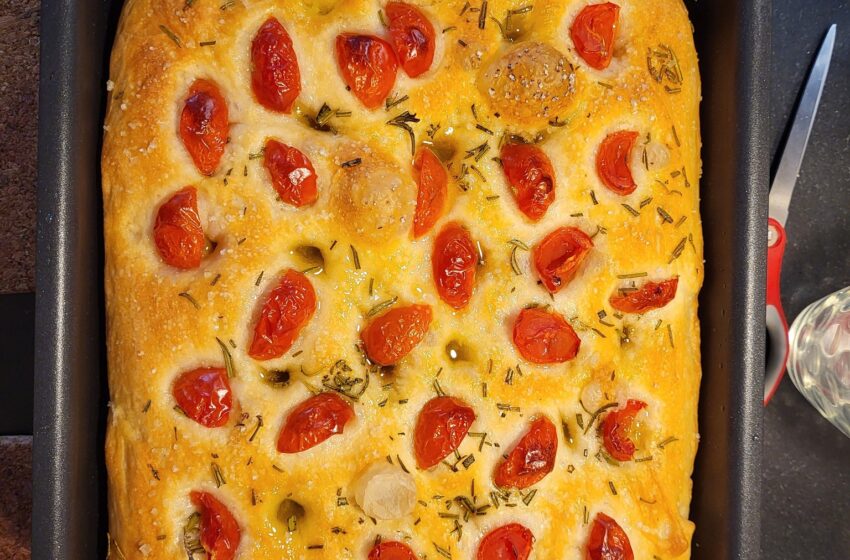
Step 6: Create the Classic Focaccia Surface
Coat your fingertips with olive oil.
Press your fingers deeply into the dough across the entire surface, creating the characteristic focaccia dimples. Press all the way down but avoid tearing the dough.
Drizzle the remaining olive oil evenly over the top so that some oil collects in the dimples.
Sprinkle with flaky sea salt and, if desired, rosemary and oregano.
Step 7: Bake
Place the pan on the center rack of the preheated oven.
Bake for 25–30 minutes, or until:
- The top is golden brown.
- The edges are crisp.
- The internal temperature reaches approximately 96°C (205°F).
If the top browns too quickly, loosely cover it with aluminum foil during the final 10 minutes of baking.
Step 8: Cool
Remove the focaccia from the oven.
Allow it to cool in the pan for 10 minutes.
Transfer it to a wire rack and let it cool for at least 20–30 minutes before slicing. This cooling period helps the crumb set properly and prevents gumminess.
Storage
At room temperature:
- Store in an airtight container for up to 2 days.
In the refrigerator:
- Store for up to 5 days.
In the freezer:
- Slice first, then freeze in airtight bags for up to 3 months.
Tips for the Best Gluten-Free Focaccia
- Use a high-quality gluten-free bread flour blend rather than a cake or pastry blend.
- Weigh ingredients with a kitchen scale for consistent results.
- Keep the dough wetter than traditional wheat focaccia; hydration is essential for a soft crumb.
- Use plenty of olive oil both in the pan and on top to achieve the characteristic crisp crust.
- Allow the bread to cool completely before cutting to improve texture and structure.
Yield
- One 9 × 13 inch pan
- Approximately 12 servings
The finished focaccia should have a crisp, olive-oil-rich crust, a moist interior, and the traditional airy texture associated with classic focaccia while remaining completely gluten-free.