Crispy Oven-Roasted Potato Rings
Introduction
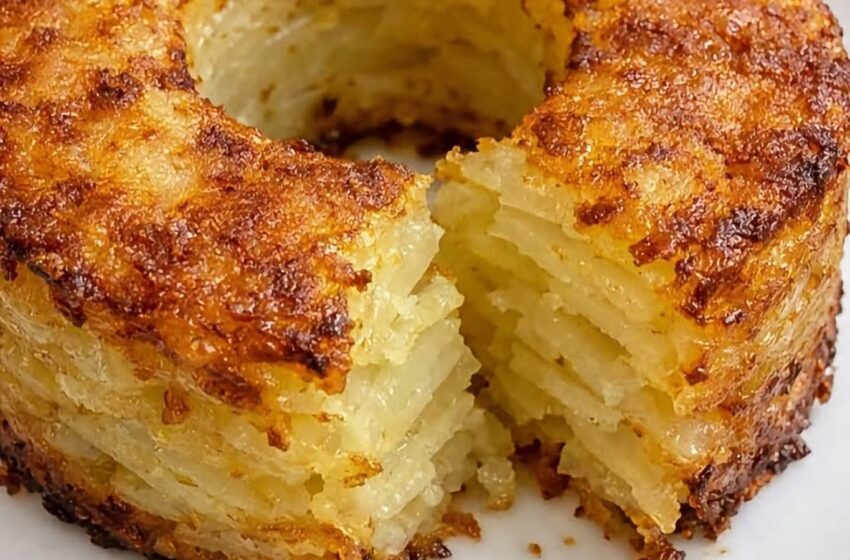
Crispy oven-roasted potato rings are a delicious alternative to traditional fried potatoes. They combine the satisfying crunch of roasted potatoes with the attractive shape and texture of onion-ring-style rounds. The secret to achieving maximum crispiness in the oven lies in selecting the right potatoes, removing excess starch, drying thoroughly, using the proper oil-to-potato ratio, and roasting at a high temperature while allowing sufficient airflow around each ring.
This detailed recipe is designed to produce deeply golden, crunchy potato rings with a fluffy interior and a flavorful seasoning blend. The method emphasizes texture development and includes extensive explanations for every step to help ensure consistent results.
Yield
Serves 6 to 8 people
Preparation Time
30 minutes
Soaking Time
30 to 60 minutes
Cooking Time
40 to 55 minutes
Total Time
Approximately 2 to 2½ hours
Ingredients
For the Potato Rings
4 large russet potatoes, approximately 1.5 to 2 kilograms total
2 liters cold water
2 tablespoons salt
For the Seasoning Blend
2 teaspoons fine sea salt
1 teaspoon freshly ground black pepper
2 teaspoons garlic powder
2 teaspoons onion powder
1 teaspoon smoked paprika
1 teaspoon sweet paprika
1 teaspoon dried oregano
1 teaspoon dried thyme
½ teaspoon cayenne pepper (optional)
1 tablespoon cornstarch
For Roasting
4 tablespoons olive oil
2 tablespoons vegetable oil
Optional Garnish
2 tablespoons finely chopped parsley
1 tablespoon finely chopped chives
Flaky sea salt to taste
Equipment Needed
Large mixing bowl
Sharp chef’s knife
Cutting board
Mandoline slicer or vegetable slicer
Kitchen towels or paper towels
Large baking sheets
Parchment paper
Wire rack suitable for oven use
Mixing bowl for seasoning
Spatula or tongs
Choosing the Best Potatoes
Russet potatoes are generally the best choice because they contain a high amount of starch and relatively low moisture. This combination helps create a crispy exterior while maintaining a soft interior.
Avoid waxy potatoes because they tend to remain firmer and do not develop the same level of crunch during roasting.
When selecting potatoes, choose firm specimens with smooth skin and no green spots, sprouts, or soft areas.
Step 1: Wash and Prepare the Potatoes
Thoroughly scrub each potato under cold running water. Remove any dirt or blemishes.
You may peel the potatoes if desired, but keeping the skin on adds texture, flavor, and visual appeal. If keeping the skin, ensure it is cleaned very well.
Pat the potatoes dry.
Step 2: Slice the Potato Rings
Place a potato on a cutting board.
Using a sharp knife or mandoline, slice the potato crosswise into rings approximately 6 millimeters thick.
Consistency is important. Uneven slices may cook at different rates, leading to some rings burning while others remain undercooked.
After slicing, use a small round cutter or carefully cut out the center portion of larger slices to create ring shapes. Smaller slices can remain as rounds if desired, but true rings provide more surface area for crisping.
Continue until all potatoes are sliced.
Step 3: Remove Excess Starch
Transfer the potato rings into a large bowl.
Cover completely with cold water.
Add 2 tablespoons of salt and stir.
Allow the potatoes to soak for at least 30 minutes. For even better results, soak for 1 hour.
During soaking, excess surface starch is released into the water. This process helps prevent sticking and promotes better browning and crispiness during roasting.
You may notice the water becoming cloudy. This is normal and indicates starch removal.
Step 4: Rinse Thoroughly
Drain the soaking water.
Rinse the potato rings several times under cold water until the water appears mostly clear.
This step further removes excess starch and improves the final texture.
Step 5: Dry Completely
Spread the potato rings on clean kitchen towels.
Pat them thoroughly dry.
Moisture is the biggest enemy of crispiness. Any water left on the surface will create steam during cooking, reducing browning and crunch.
Allow the potatoes to air-dry for 10 to 15 minutes after patting dry if time permits.
The drier the potatoes are before oiling, the crispier they will become.
Step 6: Preheat the Oven
Preheat the oven to 230°C (450°F).
Place baking sheets inside the oven while it preheats. Starting with hot baking sheets helps create immediate surface browning when the potatoes are added.
If using convection or fan-assisted mode, reduce the temperature slightly to approximately 220°C (425°F).
Step 7: Prepare the Seasoning Mixture
In a small bowl, combine:
2 teaspoons sea salt
1 teaspoon black pepper
2 teaspoons garlic powder
2 teaspoons onion powder
1 teaspoon smoked paprika
1 teaspoon sweet paprika
1 teaspoon oregano
1 teaspoon thyme
½ teaspoon cayenne pepper
1 tablespoon cornstarch
Mix thoroughly until evenly distributed.
The cornstarch contributes significantly to crispiness by forming a light coating that dries and browns during roasting.
Step 8: Coat the Potato Rings
Place the dried potato rings into a large mixing bowl.
Add olive oil and vegetable oil.
Toss carefully until every ring is lightly coated.
Sprinkle the seasoning mixture over the potatoes.
Continue tossing until all rings are evenly covered.
Ensure that no dry pockets of seasoning remain.
Step 9: Arrange for Maximum Crispiness
Remove the hot baking sheets from the oven carefully.
Line them with parchment paper if desired.
Arrange the potato rings in a single layer.
Do not overlap or stack the rings.
Leave small spaces between each ring so hot air can circulate freely.
For the crispiest possible results, place the rings on an oven-safe wire rack positioned over the baking sheet. This allows heat to reach both sides simultaneously.
Step 10: Initial Roasting Phase
Place the baking sheets in the preheated oven.
Roast for 20 minutes.
During this stage, moisture begins evaporating from the potatoes and the outer surfaces start browning.
Avoid opening the oven frequently because temperature loss can interfere with crisping.
Step 11: Flip the Rings
After 20 minutes, remove the trays.
Using tongs or a spatula, flip each ring carefully.
The underside should already be developing a golden color.
Return the trays to the oven.
Step 12: Second Roasting Phase
Continue roasting for another 15 to 20 minutes.
Monitor closely during the final minutes.
The potato rings should become deeply golden brown with crisp edges.
Cooking time may vary depending on potato thickness, oven calibration, and moisture content.
Step 13: Final Crisping Stage
For extra crunch, switch the oven to broil or grill mode during the final 2 to 4 minutes.
Watch continuously to prevent burning.
The rings should develop darker golden spots and a crackling exterior.
Once fully crisp, remove from the oven.
Step 14: Rest Briefly
Allow the potato rings to rest on the tray for 5 minutes.
This short resting period allows residual moisture to escape while the crust becomes even crisper.
Many people skip this step, but it can noticeably improve texture.
Step 15: Finish and Season
Transfer the potato rings to a serving platter.
Sprinkle lightly with flaky sea salt.
Add chopped parsley and chives if desired.
Serve immediately while hot and crisp.
Optional Flavor Variations
Garlic Parmesan Potato Rings
Add ½ cup finely grated Parmesan cheese during the final 5 minutes of roasting.
Increase garlic powder to 1 tablespoon.
Finish with extra Parmesan before serving.
Spicy Chili Potato Rings
Add 1 teaspoon chili powder.
Add 1 teaspoon cayenne pepper.
Finish with hot sauce drizzle.
Herb and Lemon Potato Rings
Add dried rosemary.
Add lemon zest after roasting.
Finish with fresh parsley and thyme.
Barbecue Potato Rings
Replace paprika with barbecue seasoning.
Add a small amount of brown sugar.
Finish with smoked salt.
Ranch Potato Rings
Add dried dill.
Add dried parsley.
Add buttermilk powder.
Finish with ranch seasoning.
Serving Suggestions
Serve alongside grilled chicken.
Serve with burgers.
Serve with roasted vegetables.
Serve as a party appetizer.
Serve with sandwiches and wraps.
Serve as a game-day snack.
Pair with garlic yogurt dip, spicy mayonnaise, honey mustard sauce, ranch dressing, or roasted garlic aioli.
Professional Tips for Extreme Crispiness
Use russet potatoes only.
Soak for a full hour.
Dry thoroughly before seasoning.
Use cornstarch.
Preheat baking sheets.
Avoid overcrowding.
Use a wire rack.
Roast at high temperature.
Flip halfway through cooking.
Finish under the broiler.
Serve immediately.
Storage
Allow leftover potato rings to cool completely.
Store in an airtight container in the refrigerator for up to 3 days.
Avoid sealing while still warm, as trapped steam softens the crust.
Reheating
Preheat oven to 220°C (425°F).
Arrange potato rings in a single layer.
Heat for 8 to 12 minutes until hot and crispy again.
Avoid microwaving because it softens the exterior and reduces crispiness.
Conclusion
These crispy oven-roasted potato rings deliver a rich roasted flavor, crunchy exterior, and tender interior without deep frying. Careful soaking, drying, seasoning, and high-temperature roasting create restaurant-quality results with simple ingredients. Following every detail in this extended method will maximize browning, texture, and flavor, producing exceptionally crisp potato rings that are ideal as a snack, side dish, or appetizer.