Buttermilk Pie
Introduction
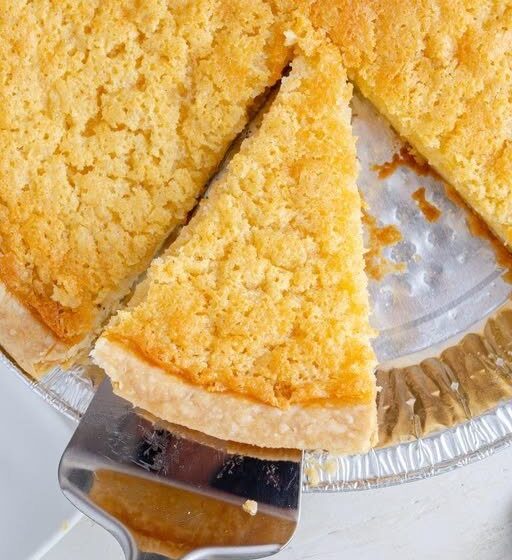
Buttermilk pie is a traditional Southern dessert known for its rich custard filling, buttery flavor, and delicate balance of sweetness and tanginess. It became popular because it used simple pantry ingredients that were easy to find even in difficult times. The pie forms a lightly golden top during baking while remaining soft and creamy inside. The flavor is similar to vanilla custard with hints of caramel and butter.
This detailed recipe explains every stage carefully so the pie turns out smooth, flavorful, and perfectly baked.
Ingredients for the Pie Crust
2 ½ cups all-purpose flour
1 tablespoon granulated sugar
1 teaspoon salt
1 cup unsalted butter, very cold and cut into cubes
6 to 8 tablespoons ice water
Ingredients for the Buttermilk Filling
1 ¾ cups granulated sugar
½ cup unsalted butter, melted and slightly cooled
3 large eggs
3 tablespoons all-purpose flour
¼ teaspoon salt
1 cup full-fat buttermilk
1 tablespoon vanilla extract
1 tablespoon fresh lemon juice
1 teaspoon lemon zest
¼ teaspoon freshly grated nutmeg
Optional Ingredients for Extra Flavor
1 tablespoon honey
1 teaspoon almond extract
2 tablespoons heavy cream
Preparation Time
Preparation time for crust: 30 minutes
Chilling time for dough: 1 hour
Preparation time for filling: 15 minutes
Baking time: 50 to 60 minutes
Cooling time: 3 to 4 hours
Total time: Approximately 6 hours including cooling
Step 1: Preparing the Pie Dough
Start by placing the flour, sugar, and salt into a large mixing bowl. Stir everything together evenly. Add the cold butter cubes into the flour mixture. Using a pastry cutter or your fingertips, work the butter into the flour until the mixture resembles coarse crumbs with small pea-sized pieces of butter remaining.
The small butter pieces are important because they create flaky layers in the crust during baking. Work quickly so the butter remains cold.
Add the ice water one tablespoon at a time while gently mixing the dough. Continue adding water until the dough just begins to hold together when pressed between your fingers. Avoid adding too much water because overly wet dough becomes tough after baking.
Gather the dough into a ball and divide it into two portions if making extra crust for another pie. Flatten one portion into a thick disk. Wrap it tightly in plastic wrap and refrigerate for at least one hour.
Chilling relaxes the gluten and keeps the butter firm, which helps create a flaky crust.
Step 2: Rolling Out the Dough
After chilling, lightly flour your work surface. Remove the dough from the refrigerator and let it sit for about 5 minutes if it feels extremely firm.
Roll the dough outward from the center, turning it occasionally to maintain a round shape. Roll until the dough is about 12 inches wide and approximately ⅛ inch thick.
Carefully transfer the dough into a 9-inch pie pan. Press gently into the bottom and sides without stretching the dough. Trim excess edges, leaving about 1 inch hanging over the rim. Fold the edge under itself and crimp decoratively.
Place the prepared crust back into the refrigerator for 20 minutes.
Step 3: Blind Baking the Crust
Preheat the oven to 375 degrees Fahrenheit or 190 degrees Celsius.
Remove the chilled crust from the refrigerator. Line it with parchment paper or aluminum foil and fill with pie weights or dried beans.
Bake for 15 minutes. Carefully remove the weights and parchment. Return the crust to the oven and bake another 5 to 7 minutes until the bottom looks lightly dry but not fully browned.
Allow the crust to cool slightly.
Blind baking prevents a soggy bottom crust once the filling is added.
Step 4: Preparing the Filling
In a large mixing bowl, whisk together the sugar and flour until evenly combined. Add the melted butter slowly while whisking continuously.
Add the eggs one at a time, whisking thoroughly after each addition. The mixture should become smooth and glossy.
Pour in the buttermilk gradually. Add vanilla extract, lemon juice, lemon zest, salt, and nutmeg. Continue whisking until completely smooth.
If using optional ingredients like honey, almond extract, or heavy cream, mix them in at this stage.
The filling should have a silky texture with no lumps remaining.
Step 5: Filling the Pie Shell
Place the partially baked pie crust onto a baking sheet. Carefully pour the buttermilk mixture into the crust.
Do not overfill. Leave a small space near the top edge because the filling rises slightly during baking.
Gently tap the pan on the counter to remove trapped air bubbles.
Step 6: Baking the Pie
Reduce the oven temperature to 350 degrees Fahrenheit or 175 degrees Celsius.
Place the pie on the center rack. Bake for 50 to 60 minutes.
During baking, the edges should become set while the center remains slightly soft with a gentle jiggle. The surface develops a golden color and may crack slightly, which is normal.
If the crust edges brown too quickly, cover them loosely with aluminum foil.
Avoid overbaking because the custard continues setting while cooling.
Step 7: Cooling the Pie
Remove the pie carefully from the oven and place it on a wire rack.
Allow it to cool at room temperature for at least 2 hours. Then refrigerate for another 2 hours or longer before slicing.
Cooling is extremely important because it allows the custard filling to fully firm up and develop flavor.
Step 8: Serving Suggestions
Serve buttermilk pie chilled or slightly cool.
It pairs well with whipped cream, fresh berries, caramel sauce, or a dusting of powdered sugar.
For a richer presentation, serve with vanilla ice cream.
Texture and Flavor Notes
A properly baked buttermilk pie has:
A flaky buttery crust
A smooth custard center
A lightly crisp sugary top layer
Balanced sweetness with slight tanginess
Warm vanilla and buttery aroma
Storage Instructions
Store the pie covered in the refrigerator for up to 4 days.
For best texture, allow slices to sit at room temperature for 10 minutes before serving.
The pie may also be frozen for up to 2 months. Wrap tightly in plastic wrap and aluminum foil before freezing.
Common Mistakes and Solutions
Problem: Filling is watery
Cause: Underbaking or slicing before fully cooled
Solution: Bake until edges are firm and chill thoroughly
Problem: Crust becomes soggy
Cause: Skipping blind baking
Solution: Always partially bake crust first
Problem: Custard cracks deeply
Cause: Overbaking
Solution: Remove pie while center still jiggles slightly
Problem: Tough crust
Cause: Overworking dough
Solution: Mix gently and keep ingredients cold
Variations of Buttermilk Pie
Chocolate Buttermilk Pie
Add ½ cup cocoa powder and ½ cup melted chocolate into the filling.
Coconut Buttermilk Pie
Mix 1 cup shredded coconut into the custard before baking.
Maple Buttermilk Pie
Replace part of the sugar with pure maple syrup.
Spiced Buttermilk Pie
Add cinnamon, ginger, and cloves for warm spice flavor.
History of Buttermilk Pie
Buttermilk pie originated in the southern United States and became especially popular in rural communities. Families often used leftover buttermilk from butter-making instead of wasting it. The recipe required inexpensive ingredients such as eggs, butter, sugar, and flour, making it practical during difficult economic periods.
Over time, buttermilk pie became a classic comfort dessert served during holidays, Sunday dinners, and family gatherings.
Detailed Baking Tips
Use full-fat buttermilk for the richest flavor.
Fresh lemon juice brightens the sweetness.
Nutmeg adds warmth without overpowering the pie.
Always place the pie on a baking sheet to catch spills.
Do not whisk aggressively after adding buttermilk because too much air can cause cracking.
Room-temperature eggs blend more smoothly into the filling.
A glass pie dish helps monitor crust browning.
For extra flavor depth, brown the butter lightly before mixing it into the filling.
Final Result
The finished buttermilk pie should have a beautifully golden surface, creamy custard interior, and crisp flaky crust. Each bite combines buttery richness, smooth texture, and subtle tanginess that makes this classic dessert comforting and memorable