Seeded No-Knead Bread in a Jar – Extra Detailed Long Recipe
Introduction
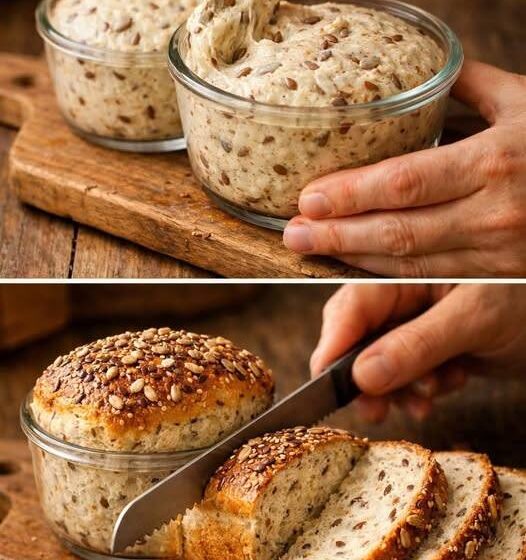
This seeded no-knead bread is designed for people who want a deeply flavorful artisan-style loaf with a crisp crust, soft interior, and rich nutty texture from mixed seeds. The dough is prepared inside a large jar or container, making it convenient for storage, fermentation, and handling with minimal mess. The recipe uses a long slow fermentation method which improves flavor, texture, digestibility, and crust development without requiring kneading or advanced baking skills.
This bread works well for breakfast toast, sandwiches, soups, salads, or serving alongside butter, olive oil, cheese, or dips. The mixed seeds create complexity in flavor and texture while adding nutrition, fiber, and visual appeal.
The method below explains every stage carefully, including flour hydration, fermentation timing, folding, proofing, baking, cooling, and storage.
Yield
- 1 large artisan loaf
- Approximately 10–12 slices
Equipment Needed
- Large glass jar or large mixing container with lid
- Wooden spoon or sturdy spatula
- Kitchen scale preferred
- Measuring cups and spoons
- Dutch oven or heavy baking pot with lid
- Parchment paper
- Cooling rack
- Sharp knife or bread lame for scoring
Ingredients
Dry Ingredients
- 500 grams bread flour
- 50 grams whole wheat flour
- 10 grams salt
- 3 grams instant yeast
- 40 grams sunflower seeds
- 25 grams pumpkin seeds
- 20 grams sesame seeds
- 15 grams flax seeds
- 10 grams chia seeds
Wet Ingredients
- 430 grams lukewarm water
- 15 grams honey or maple syrup
- 10 grams olive oil
Optional Additions
These ingredients can enhance flavor and texture:
- 1 tablespoon rolled oats
- 1 teaspoon fennel seeds
- 1 teaspoon nigella seeds
- 1 teaspoon poppy seeds
- 1 tablespoon roasted sesame oil instead of olive oil
- 20 grams chopped walnuts
- 20 grams chopped almonds
Understanding the Dough
This recipe uses high hydration dough, meaning the dough contains a relatively high amount of water compared to flour. The wet sticky texture is intentional and helps create:
- Open airy crumb
- Crispy crust
- Deep fermentation flavor
- Moist interior
- Artisan bakery texture
Because the dough develops gluten naturally over time, kneading is unnecessary.
Step 1 – Prepare the Seed Mix
Before mixing the dough, lightly toast the seeds.
Toasting Method
- Heat a dry pan over medium-low heat.
- Add sunflower, pumpkin, sesame, flax, and chia seeds.
- Stir continuously for 3–5 minutes.
- Remove once fragrant.
- Allow seeds to cool completely.
Toasting enhances aroma and prevents raw bitterness.
Do not burn the seeds because burnt seeds become bitter and overpower the bread.
Step 2 – Mix the Dough in the Jar
Combine Dry Ingredients
In the large jar or container:
- Add bread flour
- Add whole wheat flour
- Add salt
- Add yeast
- Add toasted seeds
Mix thoroughly using a spoon.
Important:
Do not place salt directly against yeast in a small concentrated area before mixing.
Add Wet Ingredients
In a separate bowl or measuring jug:
- Combine lukewarm water
- Honey
- Olive oil
Stir briefly.
Pour the liquid into the flour mixture.
Mix the Dough
Using a wooden spoon or spatula:
- Stir until no dry flour remains
- Scrape sides and bottom thoroughly
- Ensure seeds distribute evenly
The dough will appear:
- Sticky
- Rough
- Wet
- Shaggy
This is correct.
Do not add too much extra flour.
Step 3 – First Rest Period
Cover the jar loosely with:
- Lid
- Plastic wrap
- Clean towel
Let the dough rest for 30 minutes at room temperature.
This stage is called autolyse.
Benefits include:
- Flour hydration
- Easier gluten development
- Improved elasticity
- Better final texture
Step 4 – Stretch and Fold
Instead of kneading, this recipe uses folds.
How to Fold
- Wet your hand slightly.
- Grab one side of dough.
- Stretch upward gently.
- Fold toward center.
- Rotate container.
- Repeat 4 times.
The dough becomes smoother after folding.
Repeat Folding
Perform:
- 3 total folding sessions
- 30 minutes apart
After each fold the dough gains strength naturally.
Step 5 – Long Fermentation
After final fold:
- Cover jar tightly
- Let ferment at room temperature for 12–18 hours
Ideal room temperature:
- 20–24°C
The dough is ready when:
- Doubled in size
- Surface bubbly
- Slightly domed
- Smells mildly nutty and fermented
Long fermentation develops:
- Complex flavor
- Better crust
- Improved digestibility
- Air pockets
Step 6 – Cold Fermentation Optional
For even deeper flavor:
Place the dough in refrigerator for:
- 12–48 additional hours
This creates:
- Stronger artisan flavor
- More blistered crust
- Better texture
If refrigerated:
- Remove dough 1 hour before shaping
Step 7 – Shape the Dough
Prepare a lightly floured surface.
Turn dough out carefully.
Avoid pressing out all gas bubbles.
Basic Shaping Technique
- Fold edges inward
- Rotate gently
- Tighten outer surface
- Form round boule shape
Use minimal flour.
Too much flour weakens shaping tension.
Step 8 – Final Proof
Place shaped dough onto parchment paper.
Cover loosely.
Allow final rise for:
- 45–90 minutes
The dough should appear puffed but not collapsing.
Step 9 – Preheat the Dutch Oven
Place Dutch oven into oven.
Preheat oven to:
- 240°C
Heat for at least:
- 30–40 minutes
A fully heated Dutch oven creates steam and strong oven spring.
Step 10 – Score the Dough
Using a sharp blade:
- Cut one deep slash across top
This controls expansion during baking.
You may also create decorative patterns.
Step 11 – Bake the Bread
Carefully transfer dough with parchment into hot Dutch oven.
Cover with lid.
Baking Schedule
Covered Bake
- 30 minutes at 240°C
This traps steam for maximum rise.
Uncovered Bake
Remove lid.
Bake additional:
- 15–20 minutes at 220°C
The crust becomes:
- Dark golden
- Crisp
- Deeply caramelized
Step 12 – Cooling
Remove bread from oven.
Place on cooling rack.
Cool for at least:
- 1 full hour
This is important.
Cutting too early causes:
- Gummy interior
- Compressed crumb
- Moist texture imbalance
The bread continues cooking internally while cooling.
Final Texture and Flavor
The finished bread should have:
Exterior
- Thick artisan crust
- Deep golden brown color
- Toasted seed aroma
Interior
- Soft chewy crumb
- Moist texture
- Irregular air pockets
- Nutty flavor
Serving Ideas
Serve with:
- Salted butter
- Cream cheese
- Olive oil
- Honey
- Avocado
- Soup
- Roasted vegetables
- Egg dishes
- Smoked salmon
Excellent for:
- Toast
- Sandwiches
- Garlic bread
- Bruschetta
Storage
Room Temperature
Store wrapped in cloth or paper bag:
- Up to 3 days
Avoid refrigeration because it dries bread.
Freezing
Slice before freezing.
Store in airtight bag:
- Up to 2 months
Toast directly from frozen.
Troubleshooting Guide
Dough Too Wet
Possible causes:
- Humid weather
- Low protein flour
- Excess water
Solution:
- Add small amount of flour during folds
Dense Bread
Possible causes:
- Under fermentation
- Weak yeast
- Too much flour
Solution:
- Extend fermentation time
- Use accurate measurements
Flat Loaf
Possible causes:
- Overproofing
- Weak shaping
- Warm environment
Solution:
- Shorten proof time
- Shape tighter
Pale Crust
Possible causes:
- Oven not hot enough
- Insufficient bake time
Solution:
- Fully preheat Dutch oven
- Bake longer uncovered
Advanced Variations
Multigrain Version
Add:
- Rolled oats
- Rye flour
- Barley flour
Reduce water slightly if needed.
Sourdough Version
Replace instant yeast with:
- 100 grams active sourdough starter
Adjust flour and water accordingly.
Herb Seed Bread
Add:
- Rosemary
- Thyme
- Dill
- Cracked black pepper
Cheese Seed Bread
Add:
- Parmesan
- Cheddar
- Gruyère
during final mixing stage.
Nutrition Benefits
Seeds provide:
- Fiber
- Healthy fats
- Protein
- Minerals
- Omega-3 fatty acids
Whole wheat flour adds:
- Additional nutrients
- Earthy flavor
- Better texture complexity
Complete Timeline Example
Day 1 Evening
7:00 PM – Mix dough
7:30 PM – First fold
8:00 PM – Second fold
8:30 PM – Third fold
Leave overnight.
Day 2 Morning
8:00 AM – Shape dough
9:00 AM – Preheat oven
9:30 AM – Bake bread
10:20 AM – Cool bread
Ready to eat by lunch.
Final Notes
This seeded no-knead jar bread improves with practice. Every environment affects fermentation slightly, including flour type, humidity, room temperature, and seed absorption. Over time you will learn how the dough should look and feel in your kitchen.
The long fermentation and no-knead method create bakery-quality bread with very little physical effort. The jar method also simplifies storage and reduces cleanup while allowing excellent gluten development naturally over time.