A Slice Of Heaven Cake Recipe
Introduction
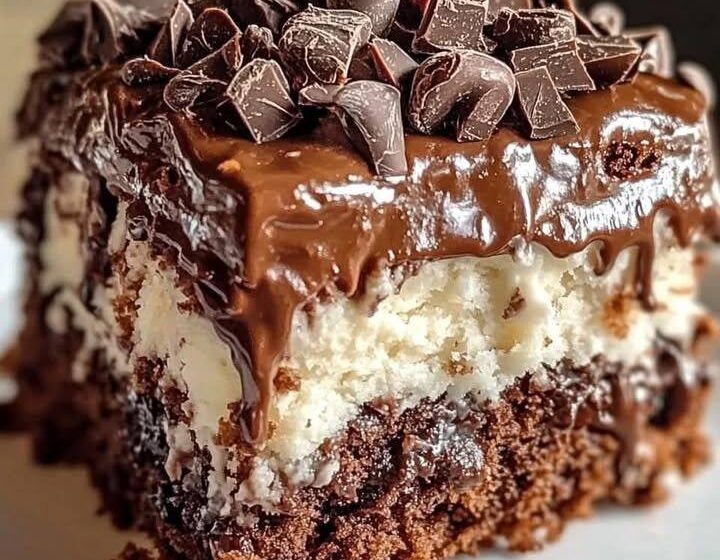
“A Slice Of Heaven” is the kind of dessert that feels luxurious, rich, soft, creamy, and unforgettable from the very first bite. This recipe combines layers of moist vanilla cake, silky cream filling, smooth chocolate ganache, and delicate whipped frosting into one extraordinary dessert. It is designed for celebrations, family gatherings, birthdays, holidays, or simply for anyone who wants to bake something truly special.
This version is intentionally detailed and extensive so every step is clear, thorough, and easy to follow even for beginner bakers. The recipe creates a large layered cake with bakery-style flavor and texture.
Preparation Information
Yield
12–16 generous slices
Preparation Time
1 hour 15 minutes
Baking Time
35–40 minutes
Chilling Time
4 hours minimum
Total Time
Approximately 6 hours including cooling and chilling
Equipment Needed
- 3 round 8-inch cake pans
- Mixing bowls
- Electric hand mixer or stand mixer
- Measuring cups and spoons
- Rubber spatula
- Offset spatula
- Wire cooling rack
- Saucepan
- Whisk
- Cake turntable (optional)
- Serrated knife
- Parchment paper
Ingredients
For the Vanilla Cake Layers
- 3 cups all-purpose flour
- 2½ teaspoons baking powder
- 1 teaspoon baking soda
- ½ teaspoon salt
- 1 cup unsalted butter, softened
- 2 cups granulated sugar
- 5 large eggs
- 1 tablespoon pure vanilla extract
- 1 cup sour cream
- 1 cup whole milk
- ¼ cup vegetable oil
For the Cream Filling
- 2 cups heavy whipping cream
- 8 ounces cream cheese, softened
- 1 cup powdered sugar
- 1 teaspoon vanilla extract
- ½ cup sweetened condensed milk
For the Chocolate Ganache
- 2 cups semi-sweet chocolate chips
- 1 cup heavy cream
- 2 tablespoons butter
For the Whipped Frosting
- 3 cups heavy whipping cream
- ¾ cup powdered sugar
- 2 teaspoons vanilla extract
Optional Decoration Ingredients
- Chocolate curls
- White chocolate shavings
- Fresh strawberries
- Crushed cookies
- Toasted almonds
- Cocoa powder
- Caramel drizzle
Step 1 — Prepare the Cake Pans
Preheat your oven to 350°F (175°C).
Grease the cake pans thoroughly using butter or nonstick spray. Line the bottoms with parchment paper circles to prevent sticking. Lightly dust the pans with flour and tap out any excess.
Properly prepared pans help ensure the cakes release cleanly and maintain smooth edges.
Step 2 — Mix the Dry Ingredients
In a large bowl combine:
- Flour
- Baking powder
- Baking soda
- Salt
Whisk the ingredients together for at least 30 seconds. This evenly distributes the leavening agents and prevents uneven rising.
Set aside.
Step 3 — Cream the Butter and Sugar
In another large mixing bowl beat the softened butter using medium speed until creamy and pale.
Gradually add the sugar while mixing continuously.
Continue beating for 4–5 minutes until the mixture becomes fluffy, light, and airy.
This step is extremely important because it incorporates air into the batter, creating a soft and tender cake texture.
Step 4 — Add Eggs and Vanilla
Add the eggs one at a time.
Beat well after each addition so the mixture stays smooth and emulsified.
Add the vanilla extract.
The batter should now look glossy and creamy.
Step 5 — Combine Wet Ingredients
In a separate bowl combine:
- Sour cream
- Whole milk
- Vegetable oil
Whisk until smooth.
The sour cream creates moisture while the oil ensures the cake stays soft for days.
Step 6 — Combine Everything Together
Add the dry ingredients to the butter mixture in three additions, alternating with the milk mixture.
Start and end with the dry ingredients.
Mix gently after each addition. Avoid overmixing because it can make the cake dense.
Scrape the sides of the bowl with a spatula to ensure everything is fully incorporated.
The batter should be thick, smooth, and silky.
Step 7 — Bake the Cake Layers
Divide the batter evenly among the prepared pans.
Smooth the tops using a spatula.
Bake for 30–40 minutes or until:
- The tops are golden
- The cakes spring back lightly when touched
- A toothpick inserted into the center comes out clean
Avoid opening the oven too early because sudden temperature changes can cause sinking.
Step 8 — Cool the Cakes
Allow the cakes to cool in the pans for 15 minutes.
Carefully turn them out onto wire racks.
Remove parchment paper and let the cakes cool completely before frosting.
Warm cakes will melt the filling and frosting.
Step 9 — Prepare the Cream Filling
In a chilled mixing bowl beat the heavy cream until soft peaks form.
In another bowl beat:
- Cream cheese
- Powdered sugar
- Vanilla
- Sweetened condensed milk
Beat until smooth and creamy.
Fold the whipped cream gently into the cream cheese mixture.
The filling should be fluffy, smooth, and stable.
Refrigerate until needed.
Step 10 — Prepare the Chocolate Ganache
Place chocolate chips in a heatproof bowl.
Heat the heavy cream in a saucepan until steaming but not boiling.
Pour the hot cream over the chocolate.
Let sit for 2 minutes.
Add butter and whisk until smooth and glossy.
Allow the ganache to cool slightly before using.
It should be pourable but not too runny.
Step 11 — Prepare the Whipped Frosting
In a chilled bowl beat the heavy cream until slightly thickened.
Add powdered sugar and vanilla.
Continue beating until stiff peaks form.
Do not overbeat or the cream may become grainy.
Keep refrigerated until ready to use.
Step 12 — Level the Cake Layers
Use a serrated knife to trim any domed tops from the cakes.
Flat layers stack more evenly and create a professional appearance.
Save cake scraps for decorating or snacking.
Step 13 — Assemble the Cake
Place the first cake layer on a serving plate or cake board.
Spread a thick layer of cream filling evenly across the surface.
Drizzle a small amount of chocolate ganache over the filling.
Place the second cake layer on top.
Repeat the process.
Add the final cake layer upside down so the top remains perfectly flat.
Step 14 — Crumb Coat
Apply a thin layer of whipped frosting over the entire cake.
This traps loose crumbs and creates a smooth foundation.
Refrigerate for 20–30 minutes.
Step 15 — Final Frosting
Apply the remaining whipped frosting generously over the cake.
Smooth the sides and top using an offset spatula.
You can create rustic swirls or a perfectly polished finish.
Step 16 — Add Ganache Drip
Slowly pour cooled ganache around the edges of the cake allowing it to drip naturally.
Spread additional ganache over the top center.
The contrast between white frosting and dark chocolate creates a stunning bakery-style appearance.
Step 17 — Decorate
Decorate as desired using:
- Chocolate curls
- Strawberries
- Crushed cookies
- Almonds
- White chocolate shavings
- Cocoa powder
You may also pipe whipped cream rosettes around the border.
Step 18 — Chill the Cake
Refrigerate the assembled cake for at least 4 hours.
Overnight chilling is even better because the flavors deepen and the texture becomes incredibly rich and smooth.
Serving Suggestions
Serve chilled or slightly cool.
This cake pairs beautifully with:
- Coffee
- Hot chocolate
- Vanilla latte
- Espresso
- Milk
- Fresh berries
Texture and Flavor Description
This cake is:
- Moist and fluffy
- Rich but balanced
- Creamy and silky
- Lightly sweet
- Deeply comforting
- Elegant and indulgent
The whipped filling melts softly while the chocolate ganache adds luxurious richness.
Storage Instructions
Refrigerator
Store covered for up to 5 days.
Freezer
Freeze individual slices wrapped tightly for up to 2 months.
Thaw overnight in the refrigerator before serving.
Tips for the Best Results
- Use room-temperature ingredients for smoother batter.
- Chill mixing bowls before whipping cream.
- Do not overmix cake batter.
- Cool cakes completely before frosting.
- Refrigerate between decorating steps for cleaner layers.
- Use high-quality vanilla and chocolate for better flavor.
- Weigh ingredients for maximum accuracy.
Optional Variations
Strawberry Heaven Cake
Add sliced strawberries between layers.
Cookies and Cream Heaven
Mix crushed chocolate sandwich cookies into the filling.
Caramel Heaven
Add salted caramel drizzle between cake layers.
Mocha Heaven
Add espresso powder to the ganache.
Coconut Heaven
Add toasted coconut flakes to the frosting.
Final Result
The finished “A Slice Of Heaven” cake should have:
- Tall elegant layers
- Creamy filling
- Smooth frosting
- Glossy chocolate drips
- Soft moist crumb
- Rich balanced sweetness
Every bite should feel luxurious, airy, creamy, and deeply satisfying.
This dessert is designed to impress both visually and in flavor, making it perfect for memorable occasions and special celebrations.