Very Long and Detailed Cheese Scones Recipe
Introduction
Cheese scones are rich, savory baked treats with a soft, fluffy interior and a golden crust. They are perfect for breakfast, afternoon tea, soup side dishes, lunch boxes, or snacks. This detailed recipe explains every stage carefully so you can consistently make bakery-style cheese scones at home.
This version creates deeply flavorful cheese scones with a tender crumb, buttery texture, and plenty of cheese throughout. The recipe includes optional flavor additions, troubleshooting tips, storage instructions, freezing guidance, and serving ideas.
Yield
Makes approximately 10–12 medium cheese scones.
Preparation Time
- Preparation: 25 minutes
- Chilling time: 15 minutes
- Baking time: 18–22 minutes
- Total time: About 1 hour
Ingredients
Dry Ingredients
- 3 cups all-purpose flour
- 1 tablespoon baking powder
- 1 teaspoon salt
- 1 teaspoon mustard powder
- 1/2 teaspoon black pepper
- 1/4 teaspoon cayenne pepper (optional)
- 1 teaspoon dried mixed herbs or thyme (optional)
Butter
- 115 grams cold unsalted butter, cubed
Cheese
- 2 cups grated mature cheddar cheese
- 1/4 cup parmesan cheese (optional)
Wet Ingredients
- 1 large egg
- 1 cup cold milk
- 2 tablespoons plain yogurt or cream
For Topping
- Extra grated cheddar cheese
- 1 beaten egg or 2 tablespoons milk for glazing
Equipment Needed
- Large mixing bowl
- Measuring cups and spoons
- Cheese grater
- Pastry cutter or fork
- Rolling pin
- Baking tray
- Baking paper
- Biscuit cutter or knife
- Pastry brush
- Cooling rack
Step 1: Prepare the Oven and Tray
Preheat your oven to 220°C (425°F).
Line a baking tray with baking paper. A properly heated oven is very important because cheese scones rise best when exposed to high heat immediately.
If the oven is not hot enough, the scones may spread instead of rising tall.
Step 2: Prepare the Dry Ingredients
In a large mixing bowl combine:
- Flour
- Baking powder
- Salt
- Mustard powder
- Black pepper
- Cayenne pepper
- Herbs
Whisk everything together thoroughly.
This ensures the baking powder spreads evenly through the flour, which helps the scones rise evenly.
Mustard powder does not make the scones taste strongly of mustard. Instead, it enhances the cheese flavor and adds depth.
Step 3: Add the Butter
Add the cold cubed butter to the flour mixture.
Using your fingertips, a pastry cutter, or a fork, rub the butter into the flour until the mixture resembles coarse breadcrumbs.
You should still see tiny pieces of butter throughout the mixture. These butter pockets create steam during baking and help produce flaky, tender layers.
Important tips:
- Keep the butter cold
- Do not overwork the mixture
- Work quickly to avoid melting the butter
Warm butter can make heavy scones.
Step 4: Add the Cheese
Add the grated cheddar cheese and parmesan cheese.
Mix gently so the cheese becomes evenly distributed.
A mature or sharp cheddar gives the strongest flavor. Mild cheese may result in bland scones.
You can also combine different cheeses such as:
- Cheddar
- Red Leicester
- Gruyère
- Mozzarella
- Gouda
Avoid overly wet cheeses because they can affect the texture.
Step 5: Prepare the Wet Mixture
In a separate bowl whisk together:
- Egg
- Milk
- Yogurt or cream
The yogurt adds tenderness and richness.
Reserve about 1 tablespoon of the mixture if you want to use it later for glazing.
Step 6: Form the Dough
Pour the wet ingredients into the flour mixture.
Using a butter knife or spatula, gently mix until the dough starts coming together.
Then lightly use your hands to form a rough dough.
The dough should be:
- Soft
- Slightly sticky
- Not dry
- Not overly wet
If the dough feels too dry, add 1 tablespoon milk at a time.
If too wet, sprinkle in a little flour.
Do not knead heavily like bread dough. Overmixing develops gluten and makes scones tough.
Step 7: Chill the Dough
Place the dough in the refrigerator for 15 minutes.
This step improves texture and helps the butter stay cold before baking.
Cold dough creates better rise and flakier layers.
Step 8: Shape the Dough
Lightly flour your work surface.
Turn out the dough and gently pat it into a rectangle or circle about 2.5 cm thick.
Thickness matters greatly. Thin dough creates flat scones.
For layered scones:
- Fold the dough in half
- Rotate
- Flatten gently again
- Repeat once more
This creates light flaky layers.
Step 9: Cut the Scones
Use a round cutter or sharp knife.
If using a cutter:
- Press straight down
- Do not twist
Twisting seals the edges and can prevent rising.
Place the scones on the prepared baking tray with a little space between them.
Step 10: Add Glaze and Toppings
Brush the tops with beaten egg or milk.
Sprinkle extra cheese on top.
Optional toppings:
- Cracked black pepper
- Chili flakes
- Sesame seeds
- Herbs
The glaze helps create a shiny golden crust.
Step 11: Bake
Bake for 18–22 minutes at 220°C (425°F).
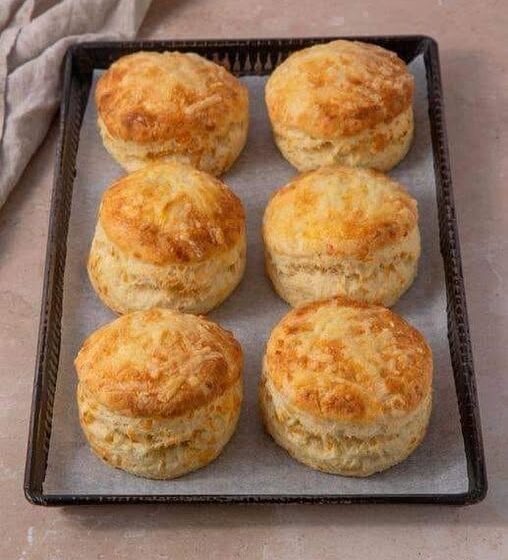
The scones should become:
- Golden brown
- Well risen
- Crisp on top
The cheese on top should bubble and slightly crisp around the edges.
Avoid opening the oven door too early because temperature loss can reduce rising.
Step 12: Cooling
Remove from the oven and place on a cooling rack.
Allow them to cool for 10 minutes before serving.
Cheese scones are best warm but can also be enjoyed at room temperature.
Texture Guide
A perfect cheese scone should have:
- Crisp golden top
- Soft fluffy center
- Rich buttery flavor
- Distinct cheesy taste
- Light flaky texture
Optional Flavor Variations
Spicy Cheese Scones
Add:
- Chopped jalapeños
- Chili flakes
- Cayenne pepper
Herb Cheese Scones
Add:
- Fresh chives
- Rosemary
- Thyme
- Parsley
Garlic Cheese Scones
Add:
- 2 cloves finely minced garlic
- Garlic powder
Onion Cheese Scones
Add:
- Caramelized onions
- Spring onions
Smoky Cheese Scones
Add:
- Smoked paprika
- Smoked cheddar
Serving Suggestions
Cheese scones pair wonderfully with:
- Tomato soup
- Potato soup
- Scrambled eggs
- Butter
- Cream cheese
- Pickles
- Chutney
- Tea
- Coffee
They also work well in lunch boxes or picnic baskets.
Storage Instructions
Room Temperature
Store in an airtight container for up to 2 days.
Refrigerator
Store for up to 5 days.
Reheat before serving for best texture.
Reheating
Oven
Bake at 180°C for 5–7 minutes.
Air Fryer
Heat for 3–4 minutes.
Microwave
Heat briefly for 10–15 seconds, though this may soften the crust.
Freezing Instructions
Freeze Before Baking
- Cut the scones
- Place on tray
- Freeze until solid
- Transfer to freezer bag
Bake directly from frozen and add a few extra minutes.
Freeze After Baking
Cool completely before freezing.
Wrap individually for convenience.
Common Mistakes and Solutions
Problem: Flat Scones
Causes:
- Warm butter
- Overworked dough
- Old baking powder
- Thin dough
Problem: Tough Texture
Causes:
- Too much mixing
- Too much flour
- Excess kneading
Problem: Dry Scones
Causes:
- Overbaking
- Too little liquid
Problem: Poor Flavor
Causes:
- Mild cheese
- Insufficient seasoning
Professional Bakery Tips
- Always use cold ingredients.
- Handle dough gently.
- Use strong-flavored cheese.
- Bake in a fully heated oven.
- Chill dough before baking.
- Keep dough thick for taller scones.
- Avoid overmixing.
Nutritional Estimate Per Scone
Approximate values:
- Calories: 260–320
- Protein: 9g
- Fat: 15g
- Carbohydrates: 25g
Values vary depending on cheese and size.
Complete Quick Summary
- Preheat oven
- Mix dry ingredients
- Rub in cold butter
- Add cheese
- Mix wet ingredients
- Combine gently
- Chill dough
- Shape thick dough
- Cut scones
- Glaze and top
- Bake until golden
- Cool slightly and serve
Final Notes
Cheese scones are one of the easiest savory baked goods to master once you understand a few key techniques: cold butter, gentle mixing, thick dough, and high oven temperature. The recipe can be customized endlessly with herbs, spices, vegetables, and different cheeses.
Freshly baked cheese scones with melting cheese and a buttery interior are comforting, filling, and ideal for almost any occasion.